Tips Tricks for Furniture and Room Deriving,
Basic Seamless Textures
We will be working in Photoshop 7 for this tutorial, any GIMP, PaintShop, or other program users please feel free to share what tools will work in lue of the ones we will be using this week. I’m purposely going to be using the older PS7 so that all PS users will have access to the same tools. I will however jump over to Photoshop CS4 on occasion to show you some cool tricks it has that those who have CS4 will want to use (and for those who don’t who have been thinking about upgrading will see some of the fancy stuff)
Photoshop Tools We Will Use
Layers
Marquee
Crop
Clone Stamp
Offset Eraser
Vocabulary
Photoshoped: The act of using an image editor to edit an image.
Foreshortening: The distortion created when one looks at something from an angle
I figured seamless textures would be the best place to start for this week’s installment as it was requested and it really is the bread and butter skill of room texture making and all the texture work we will be doing later will build of seamless textures as their bases.
A seamless texture is a texture that when butted up against itself has no visible seams so that when tiled the seam lines are imperceptible. Most if not all rooms and several furniture items use this type of Tiling UV mapping.
This is also the skill for making website, homepage and product page background wallpapers seamless
Any image can be made to be seamless, but not all images will look good when tiling.
What images makes good seamless textures
Not all images will tile well so it’s a good idea to familiarize yourself with what to look for before you waist your time making something seamless that is just going to look awful.
Simple Images: Don’t use images that are of some specific identifiable thing such as a portrait, a vase, a logo, a picture of your cat. This image will be repeated over and over and oooover, so anything that should really just be used as a focal point should not be used or else your project will just end up looking busy. (unless that is the intent). Repeating patterns are okay so long as it looks like it should be a repeating pattern, wallpapers, upholstery patterns, floor tiles etc.
Even Images: Ideally you want an image that dosn’t have any one part that jumps out at you more than another. Any part of an image that stands out should be photoshoped out. Elements that may not seem so visible when looking at the texture as a single image, once it tiles will become glaringly apparent, thus destroying the illusion of fluidity seamless textures can create.
Even Lighting: You want an image that is evenly lit across the whole image. Anything that has a gradient of lighting, no matter how subtle it is, will not make a good seamless texture. As you get more skill in Photoshop you can use gradient layers to counter the lighting gradient in the source texture, but that is not something you’ll want to mess with if you can all help it. Likewise any bold shadows can also become a issue, especially on ground textures, since those texture will be viewed from every angle shadows can become a annoying problem.
Square Perspective: You will want to use an image that is flat to the viewer, anything that is on an angle will become problematic. Photoshop has some great tools for correcting perspective foreshortening issues but its never as good as having a nice square image to begin with.
Seamless Texturing methods
There are as many methods to making things seamless as there are Photoshop users. I myself use different techniques depending on the source image and what my ultimate goal with it is.
For this guide I will show you two easy methods, the Clone Tool Method and the Erasing Method. Both these methods are quick and easy once you get the feel of them, and they will also lay the groundwork for you for using more advanced methods for complex images.
Image Sources (boring copyright lecture alert)
Before we begin work I figured we better stop a moment to talk about images and where they come from. Everyone knows about copyright, right? The same laws that protect your finished works and my finished works also apply to every image you will find on the web. Images found on the web are NOT useable unless they specifically say they can be used for ‘commercial’ perposes. ‘Free to Use’ does not mean commercial use. I won’t go on and on on this, the main thing is know your sources, respect their wishes, and only use what is meant to be used commercially. Ready made graphics and ‘Wallpapers’ found on the web generally are for personal ‘use’ not for actual commercial use
Legal Image Sources:
Your Camera: Images you take are copy written to you! (so long as you not using picture of a work of art, logo or brand or something like that.) We will have a camera week devoted to taking pictures for textures.
3D Design Texture source Websites: There are many image source websites on the web. You will want to be looking for the ones who cater to 3D artists as those images tend to be more in line with what a texturer would need. There are several free advertising supported sites, but the best ones are by subscription. Paying your fees giving you access to use their databases on your commercial works. Most of the gaming industry uses these texture image banks for their texture work. Be sure to read the TOS of any site. I won’t list any here but they are just a Google search away!
Seamless Texture Making Tutorial
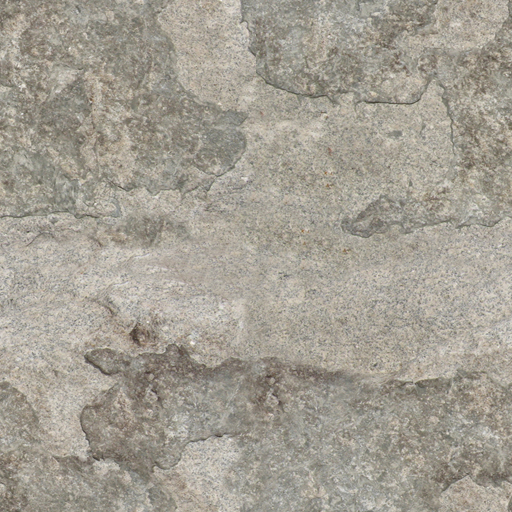
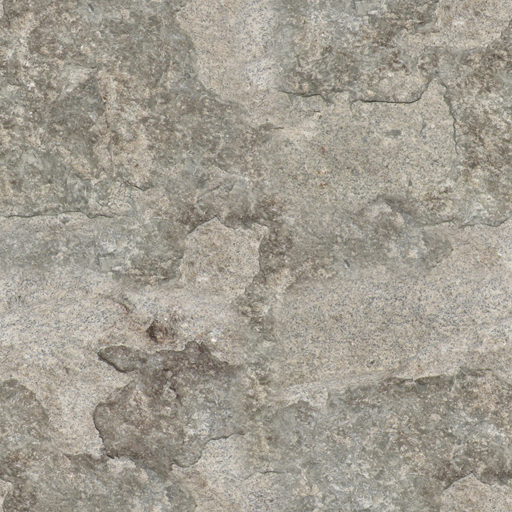
Here is an image I took, feel free to use and abuse it all you wish. Any derivative work of this image may be used on your products.

right click, save image as
Step one, Prepping the Image.
For all methods first chose the area of the source image you will want to use, you want to pick an area that is mostly uniform and doesn’t have any real outstanding elements that will make the repeat obvious.
Crop the image to an approximate square, Use the Marquee tool to select part of the image then crop to that area (Image/Crop)

Then re-size your image to a 512×512 image to make it purely square that will conform to the 2x rule.
It’s a good idea to make all your images pre conform to these sizes and get used to working with them.
(Image/Image Size)
Save the cropped image as a jpg with a new name that you’ll remember.
Now were ready to make it seamless!
The Clone Stamp Method
First we will slide the image so we see the seam using the Offset tool.
Filter/Other/Offset
If our image is 512 wide then we know 256 is exactly half so put in 256 to the Offset Horizontal. (I find it easer and I get a better result if I just worry about one direction at a time, but you can do both directions at the same time if you like.)
The image will have slid along 50% exposing its seam.
Offset Notes:
I like using numbers for my offsets that I will remember for this so I can go back to the original alignment image easily so I tend to stick to the 2x dimensions. This is not really important for this texture as its random, but if doing something with a pattern it will be very important to restore to center.
Be sure if using a working file that goes ‘outside the lines’ of the image that you crop the image to itself (Zoom out and drag the marquee tool around the whole image and then Image/Crop. Otherwise you will be offsetting the outside of the lines part too and you will not get a seamless result.
Offset will only effect the working layer, so be aware of that if working on an image that uses multiple layers.
CS Offset
In CS4 (not sure if this one is in other CS versions) You have offset sliders. Slide them along and the layer will slide with them, great for checking things. Looove these!
Now for the clone tool, select it on the left hand toolbar.
Then move the curser over an area you want to sample from, hold down ‘alt’ then left click the mouse. move the mouse to where you want to drop the sample and click. Now draw with it as it it were a brush tool along the line and it will take the image from the source location and draw it in the new location. (watch for the little cross when your drawing to see were it is taking from.

Presto changeo no seam!
Now repeat for the other direction!
Save the image again with a new name, I personally add seamless to it so I know it has been prepped so mine is Keefs_Rock_Seamless.jpg.
Sexy and Seamless!
Some notes on clone stamping…
-Don’t sample from right by the image, it becomes obvious.
-Mix up the sample locations to add randomness.
-Don’t sample too close to the edge of the image or you will get an ugly line.
-Play with the brush intensities and types to get different looks.
-Take your time, it takes a while to get a good feel for this tool.
CS4 Clonstamping: Anyone who says CS4 has nothing new is smoking something!!!!
CS4 made a huge leap in the clone stamp tool that one you have it you will wonder how you ever survived before, and for anyone serious about texture editing this tool advance alone is worth upgrading for.
CS4’s clone stamp offers you a clone preview so you can actually see what it is you will be stamping so as to line things up perfectly.
I tinted one side dark so you can see where the seam was.
Using CS4′s clone with the preview you can eaisly contiue the line detail across the seam on the first attmept vs have to use trial and error.
The Erasing Method
This one is best used only on simple or organic images
Open up our first saved image.
Make a duplicate layer. (Layer/ Duplicate Layer)
Offset the new layer 256v 256h

Now….. wait for it… just erase the lines.
Yep its that simple, select the eraser with a soft brush setting and run it down the line and poof, seamless!
On more complex images you will have to be more fussy about what and where you erase to get a proper blend.
Once happy flatten the image then save it with a new name.
Ta Da!
Once you get used to them you will find you have an affinity to one method over the other, and again there are many more methods to remove seams so don’t be afraid to experiment. In the end you will probably end up with a blend of styles using them all in one way or another in your project.
Next installment is on more advanced seamless skills, perspective corrections and gradient corrections.
![]()