Tips on How to Texture a Kick A$$ Room
Room texturing while seeming daunting and complex at first is really not much different than clothing texturing, in fact some find it much easier as you don’t have to deal with textures wrapping around the avatar’s shape.
A room’s textures are replaced on the texture tab just as a garment’s are. The only difference being when dealing with a room there may be many many more textures to deal with.
Things that may be new to you
Vertex Colors:
One texture setting that is used in some rooms and furniture that you may not be used to is the Vertex Colors setting.
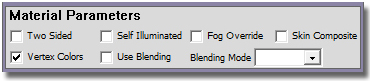
Vertex Colors Checkbox
If a mesh is using this feature this box will be checked. If this is checked the mesh is pre tinted with lighting/shadow/color effects already built into the mesh. Most of the time this is a really cool feature but if you find the built in effect is interfering with your texture just un-check that box and the texture will render true.
Note: if you check Vertex Colors and the mesh is not using this feature the mesh will turn black, just un-check it to return to normal.
Ambient Lighting and Fog:
In addition to replacing textures you can also modify a room's ambient lighting and fog effects. To play with lighting and fog go to the Config Tab and Expand the Room Fog and Lighting Parameters settings.
Create Mode's Config Tab Room Settings
A Scene's Ambient Light will change the color of the dominate lighting in the room. You can either slide the sliders for a color, or you can manually type in the RGB values. The room may also be using additional lighting built into the room mesh, this other lighting can only be altered by the mesher.
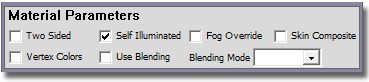
Any texture set to ‘Self Illuminated’ will not be effected by a room's lighting.
Self Illuminated Checkbox
Lighting TIP:
If you want the room to be 'Shadowless' set all the Ambient Lighting values to max. The room's ambient lighting will then overpower any other lights in the room.
If you want the room to function with illuminating products then keep these in the low to mid range, the lower the room's Ambient lighting the more intense other lights will appear.
Fog is used to add fog effects, most useful in outdoor rooms and moody interiors. The Fog Color Sliders will set the color value of the fog.
‘Near Distance’ will set the point at which the fog will start to render, ‘Far Distance’ will set the point where the fog becomes opaque.
‘Fog on’ needs to be checked to activate the fog.
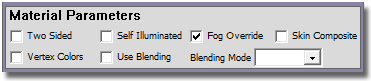
Any texture set to ‘Fog Override’ will render true through the room's fog settings, great for skys.
Fog overide checkbox
You can get everything from a subtle hazy day to pea soup fog with these settings, play with them to see all the fun you can do.

Picking a Good Room
For a more in depth guide on room Lighting and Fog use click here.
What to Look for Before You Begin
All rooms are not created equal so here are some key things to look for when picking out a room mesh to work with…
Cost:
Price Lets face facts, if you can’t afford to derive from it is no use to you. Pick a room in your budget, and remember pricing on IMVU is VERY subjective and does not directly effect quality so don’t be afraid of low cost rooms or think that you can only make a good room with an expensive mesh. (Do note IMVUinc’s mesh prices are much cheaper than their list prices.)
Layout, Node and Seat Placement:
Are you happy with the rooms layout, Scale, Seats, and node placement? There is no way to change these so make sure before you spend hours and hours on a room that you will be happy with the room’s bones.
UV Mapping:
Is the room UV mapped thoughtfully? (UV mapping is the process a mesher goes trough that assigns how textures will be applied to the mesh.) You will want to see how a room’s textures tile before you commit to re-texturing it.
Unfortunately there are a lot of room meshes out there that are put together quickly and/or do not take into account a texture maker’s needs. They will have textures tiling where you really need to have detail, texture seems it the most awkward places, and areas with complex mapping with no maps provided to make textures with. While these rooms will work fine for a ‘slap and go’ texture, for anyone wanting to fit textures to the room they are useless. I have had to pass up on texturing many a room because of sloppy thoughtless UV mapping and it was this is lack of useful UV mapping on rooms that motivated made me get into room meshing myself.
If you are unsure of how a room tiles you can test derive from it then put in a texture alignment image in as your texture and it will show you how things line up, you can make your own or use mine. Ideally texture seams should be in logical places, repeats evenly spaced, seams in logical places.
texture alignment tester
File Size:
File Size is important. Look at how big the file size is of the room you are deriving from, remember a product can be no bigger than 2mb, if the base mesh is already close to that size you won’t have much room to play with.
Start Small if this is your first room pick a smaller one with not too many textures to make. As you get more comfortable move up to more complex rooms.
IMVUinc makes some great starter rooms, with some even come with guide textures to help in making your own textures.
Tips on Making Room Textures
Getting Started:
First and foremost, know this, great room textures are not found they are made. When I say texturing I am referring to the act of making images from scratch and/or using legitimate image sources as ingredients to make custom textures to fit your needs. (Legitimate image sources are photos you took yourself, free and paid for texture bank textures designed for use in texture and image making.)
Key Points to focus on when making your room textures….
Pick a Pallet/Color Theme.
Stick to a limited pallet, pick a few base colors and maybe only one or two accent colors and coordinate all your texture to those hues. If you can, open several of your textures in your image making program at the same time so you can sample colors back and forth to make them all match up.
Textures should look as if they are from the same environment, reflect the same time of day, and share the same tint of lighting.
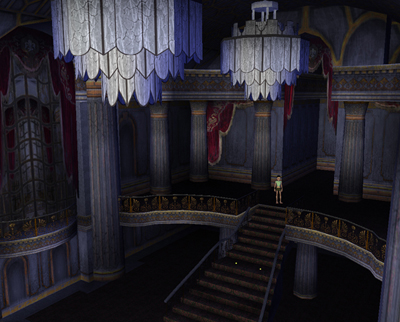
Haunted Hotel by IMVUinc all textures match and use a limited pallet (grey, gold, red)
Make Textures to Fit for Their Locations!
If you need brick just don’t slap a image of brick in there and call it done. You need to fit it into its use.
Wold the brick be like that there?
Would it line up like that?
Should it have a bit of detail here, a bit of trim, there?
‘Slap and Go’ texturing as I call it, will never be a standout and will always look amateurish compared to textures made to fit their purpose.
Scale Scale Scale!
I find scale to be the one of the big thing beginning textures do not think about and don’t see, but it is critical to making a room feel ‘right’.
A close-up of wood grain should not be used to cover a wall.
Tiles on a floor should not be bigger than a car.
A doorknob should not be at head height.
Think of yourself in that space, how big would the wall pattern be to your hand, now look at it to the avatar’s hand, how big would the floor tiles be to your foot? how big are they to the avatar’s foot?
Make it Seamless!
Many room textures tile in IMVU to keep file sizes down, you will need to learn how to make your textures seamless in order to make textures work in these situations so that the lines between the tile repeates disappear.
This is a core room texture making skill and one you should endeavor to master.
Google up your image making program and ‘seamless texture making’ and you will find several tutorials on the subject. Master it.
Don't be Photorealistic!
Photorealistic is Bad! I see room after room that just use photos as textures. IMVU and its avatars are not photo realistic so textures used in IMVU should NOT be photo realistic.
IMVU’s avatars are NOT photo realistic so there environment also shouldn not be!
Even today's more realistic avatars are not in any way Photorealistic.
Instead of photo realism you want to a archive a level of realism that is true to the IMVU avatars reality not true to real life. If you are going to photosouce experiment with dumbing down of the images to bring them into balance with how the IMVU avatar looks.
Look to Disney, Anime, Pixar Films, and other animation as well as avatar using computer games for inspiration on how rooms and settings are rendered to match the reality of the characters that inhabit them.
Highlights and Shadows!
The same care one would make to add highlights and shadows to a garment should also be applied to room textures.
Where would the light be hitting it?
Where would it be in shadow?
Add those same elements to your room’s textures.
Less is More!
Rooms should not be using large textures, you should be aiming for textures in the smaller range, 512s being reserved for only the largest locations (skys and such), Your room’s file size will be smaller and your room will actually look better for it.
If you have ever been in a room that the textures appear to shimmer this is due to the use of cramming over sized textures into to small of a space. Aim for the majority of your textures being in the 32, 64, 128, 256 range, as small as you can get them is always best. If you are using just using a solid color then that can be a 2×2!
Remember the room is the Backdrop and should not be competing for focus over the items and avatars that will be in it.
Learn!
And lastly, Google is your friend, Use it! (nooo, not for finding textures, for making them!!!) There are hundreds of great texture making tutorials out there, need to make wood? metal? glass? It’s all out there for the learning. Its also full of inspirational imagery to get your creative juices flowing.
![]()